Website: www.wafernsociety.com.au Email: wafernsociety@gmail.com
Growing ferns from spore – a basic guide
by WA Fern Society members Jill and Vaughan
Select a container. Probably a clear plastic one with a tight-fitting lid would be best. Propagation trays can be used. It does need to be sealable. This will keep up the required humidity.
Choose your media. This can be peat, sand, vermiculite, perlite, sphagnum, or a combination of some of these such as seed -raising mix. Coconut coir is not suitable but coco-peat can be used. Fill the container to about 4-5 cm below top of container. The authors use Scotts Seed & Cutting mix with the small bark sieved out.
Dampen the media in the container- not too damp but not too dry. Use distilled water or previously boiled water to avoid any contaminants in the water. If you wish the container can be sterilised at this time in a microwave for 3-5 minutes to kill bacteria and fungi. Allow to cool if it has been microwaved but keep covered.
Sprinkle spores on top of media. Thin and even sowing is ideal. Spray lightly with distilled or previously boiled water, label and cover. Place container in a light warm position, not in direct sunlight.
Be patient. You should see prothalli in about 6-8 weeks but some ferns will be quicker and others can take a lot longer, even up to a year. They first look like green scum but will take shape over time. If there is a lot, you might wish to thin them out. If the container is too crowded the sporelings will not grow. Do not allow it to dry out once the prothalli appear as water is required for fertilisation to occur. If the container is fully sealed check about once a week, if not fully sealed check more regularly.
When prothalli are bigger they will grow male and female organs. The male organ makes sperm which swim to the female part and fertilise the egg. The egg will then grow into the fern plant or sporophyte. This is why, as mentioned previously, it is very important to keep prothalli damp at this time so this can occur.
After about another 6-8 weeks you will see little ferns come up. You can thin them out if they are too thick or you can pluck them out into another container at this stage. Just realise that they will require much more delicate handling and aftercare if you pluck them at a young age. The same media can be used at this stage.
Once they have achieved a reasonable size you will need to harden them off to the dry air outside their container. This can be achieved by opening the top for short periods increasing the time over about 2 weeks. If they start looking sad re-cover them for a while then try again. This is where most ferns are lost as it is a difficult adjustment from the humid, warm home or microclimate the sporelings have been in for such a long time. It is a stressful time for the sporelings and some losses are likely to occur.
Pot on into potting mix or epiphyte mix depending on the type of fern. Keep in a shady place. If they show signs of wilting you may wish to provide some sort of cover and harden them off again. Care should be taken for about 6 -12 months depending on the species.
The closed conditions favour the growth of moulds, algae and fungi. These infections can occur even if everything has been sterilised. These infections don’t directly attack the growing sporelings but may crowd them out. Treatments include removing the infected area and about 1cm around it or fungicides can be used to slow the growth of fungi. The authors have recently been trialling cinnamon which can be used as a powder on larger sporelings or by boiling 3 cinnamon sticks in a litre of water for 3 mins and spraying the cooled liquid on the infected area. This appears to be keeping most of the fungal problems under control.
Sowing spores by WA Fern Society member Andrew Van Twist
As there are several theories for the sowing and growing of Platycerium spores the methods outlined below show how I prepare and sow spore.
This is not the only method where information is available and may differ to what I have included. The information is provided as a guide only, I believe you will over time figure out what works and what doesn’t work for you. You must take into consideration the variations in not only the products used, but also the climate and environmental variations that can easily affect the outcome of the spores you sow.
Resources required
1000 ml microwaveable plastic fast food containers with tight fitting lids, enough for the quantity of spore you wish to sow.
Seed raising mixture, I use Scott’s seed raising mixture (available from Bunnings).
Distilled water (available from Bunnings).
Spray bottle (sterile)
1 cup measuring cup
½ cup measuring cup
Piece of wood for leveling or equivalent.
Microwave oven.
Demo labeller or other method of labelling container. I have also used permanent marker on waterproof cloth tape (available from Bunnings).
I use a metal press open Tea diffuser that I bought cheaply at a kitchen store to help spread my spore, I place a small amount of spore in the device and gently tap to release the spore above the open container.
Warm well lit position to place containers after sowing, some spore can take a considerable time to germinate, so the position should ideally be out of the way. I have a rack in front of a frosted window in my bathroom, this helps maintain a constant warm environment for germination whilst providing sufficient light for germination.
Method
Place 1 level cup of seed raising mixture into container ( I do not compress the mixture)
Add ½ cup distilled water into container, I use a piece of wood to pat mixture level in container.
Put lid on container.
Place in microwave full power for five minutes.
Remove from microwave carefully as the container will be very hot.
Allow to cool until back to room temperature, usually about an hour or so, Ideally, leave them overnight.
You should now be ready to sow your spore. Find a well lit breeze free place, I use my kitchen bench.
Using a tea diffuser or other device to gently sprinkle spore onto the cooled mixture within the container. Try to ensure a sparse spread of spore.
Replace the lid as soon as possible.
Place container in your allocated warm and well lit position, leave alone.
Do not open the container.
Things to consider
When sprinkling spore, use a light hand, overcrowding spore at this stage will make it difficult to seperate the small ferns at a later stage.
Avoid opening the container as you want to keep the environment sterile.
After a few weeks you should be able to see a greenish tinge, and a few week after that you will see little green growths called prothalus.
The prothalus contain both the male and female organs and require sufficient moisture to allow the sperm to reach the ovum, after this has occurred a fern will commence to grow (as in this diagram).
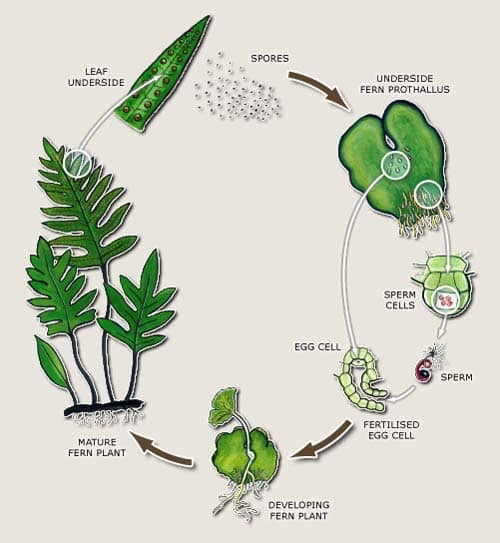
Once the prothalus are sufficient in size, lightly mist with distilled water to encourage fertilisation. I use a new sterile/ cheap spray bottle. Seal the container once again. Hopefully you will see some results in about a month or so.
The next stage
Once you can see baby ferns starting to grow (sporophytes), usually once they have two or three fronds. I use a pair of bent tweezers to “pluck” the baby ferns and plant them directly into a Jiffy pot tray(compressed peat pellets).The trays I use are not cheap but I find the main benefit of not transplanting the baby fern too many times helps their continued growth without interruption.
The Jiffy pot trays I use come in the options of 12, 36 and 72 pots in the tray. These trays come with a clear plastic cover that retains the moisture and humidity within the tray.
Once the baby ferns have reach a good size they can be mounted on shields
I use sphagnum moss to secure the jiffy pot and allow the baby fern to continue to grow.